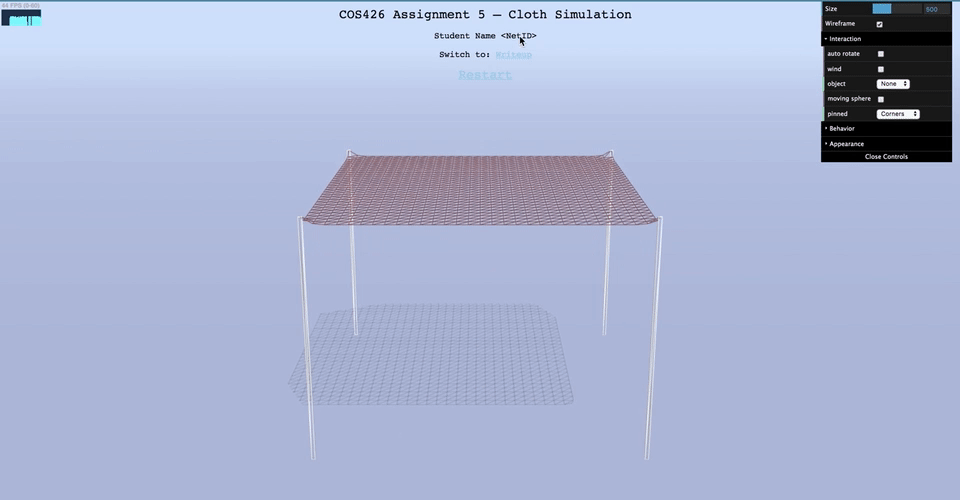
 initial cloth held by its corners
Before you start, here's some basic information on the structure of the starter code.
js/gui.js: Code for the GUI menu in the top-right. You may need to modify this if you want to add new interactive features to your simulation.js/render.js: Code for rendering the scene. It uses Three.js to create and render the application in your browser. This is the main "starting point" of the cloth simulation. You may find it helpful to briefly take a look at its animate() and render() functions. The animate() function calls the simulate() (which is defined in js/sim.js) and render() functions repeatedly in a loop, which produces the results in your browser.
simulate() function performs the cloth physics in order to compute new positions. Then, in render(), these new positions are copied into a parametric mesh that is rendered onto your screen as the cloth.js/sim.js: Code for the overall simulation. This file contains global variables that define the state of the simulation, including the cloth itself, which is a global variable called cloth. The main function of interest is simulate(), which performs one "step" of the simulation. It is highly recommended that you look at this function to get a high-level understanding of what should be happening in each iteration of the simulation. Note that the almost all of the operations are cloth methods, and you will be implementing them!js/cloth.js: Code for the cloth physics component of the simulation. This file contains global variables that define the cloth's properties (which can be modified interactively in the GUI). It also contains a definition for a Constraint object, which is used by the Cloth object defined further below. A Cloth object is defined primarily by its Particles and Constraints. Most of the Cloth object's functions (including the constructor) are left for you to implement.js/particle.js: Code for the Particle object used by the Cloth object. The constructor is provided.js/student.js: Before going any further, edit this file so that it contains your name and NetID!In computer graphics, many different cloth models have been developed for simulation purposes. Of these, one of the simplest models uses a system of particles ("point masses") and springs. Given a sheet of cloth with some desired dimensions and parameters, we can divide the cloth up into evenly spaced particles and then connect nearby particles with springs. The springs hold the particles together and the different types of springs affect how the cloth behaves.
Before writing any code, look through js/cloth.js and js/particle.js and get an understanding of the constructors for the Cloth, Particle, and Constraint objects.
initial cloth held by its corners
For this part, we will be working with the Cloth constructor in js/cloth.js. The image above shows the wireframe of the cloth, but the underlying structure of particles and springs does not exist yet, which we will need if we want to be able to simulate the cloth's physics and then animate it.
The starter code in the constructor creates the list of Particle objects that make up the cloth and stores it into this.particles in row-major order.
Next, we need to create the springs that bind the cloth's particles togther. In this assignment, our springs are represented by Constraint objects. Each Constraint object requires 3 things: the two Particles that it constrains, and the desired rest distance between them.
The starter code handles the necessary structural constraints along the edges of the square cloth as an example (hooray, the edge cases are handled already!).
In addition to these structural constraints along the edges, you will need to create springs to apply structural, shearing, and bending constraints to the particles.
restDistance (the distance between two adjacent particles in the same row or column in the uniform square grid of particles).restDistance, scaled by restDistanceS (see the constants at the top js/cloth.js). Make sure you understand why this is the case!restDistance, scaled by restDistanceB. See above.
image borrowed from UC Irvine's CS114
index to convert a desired 2D index into the appropriate 1D index in the particles list.Big Picture Note: Unfortunately, you won't be able to tell if your code is correct just yet, but you can toggle the existance of the types of springs in the GUI and see if there are any syntax errors in the Console.
Recall that each Constraint object contains 2 Particle objects, which are stored in this.p1 and this.p2. In addition, it stores a desired rest distance in this.distance.
In this part, we will approximate the effects of the spring forces acting on their particles and avoid directly using Hooke's law. To do so, we will enforce a constraint on its two particles by computing the vector \(v_{12}\) from one particle to the other. Then, we compute the correction vector as:
\[ v_{corr} = \frac{||v_{12}|| - d}{||v_{12}||} * v_{12}\]
where \(d\) is the value stored in this.distance.
Step 1: Complete the Constraint.prototype.enforce function in js/cloth.js. Apply half of this correction to one particle, and half to the other particle, to bring them closer to each other along the line that connects them. Be careful to bring the particles closer together, rather than apart.
Step 2: Next, complete the Cloth.prototype.enforceConstraints function in js/cloth.js. In this function, loop over the cloth's constraints and enforce each one by calling the function you just wrote above.
Big Picture Note: Recall that this function is called every timestep in the simulate() loop. Unfortunately, at this point, we still can't observe anything interesting just yet.
Now that we have set up the cloth model as a system of particles and springs (constraints), we need to integrate the physical equations of motion in order to apply the forces on our cloth's particles to compute how they move from one timestep to the next.
To start off, let's make it so that each particle in the cloth experiences the effects of gravity.
Step 1: Add support for a particle to accumulate forces acting on it by filling in Particle.prototype.addForce in js/particle.js. This should be a one-liner.
Step 2: Next, complete the Cloth.prototype.applyGravity function in js/cloth.js so that it applies a force due to gravity to each of its particle.
GRAVITY which is the acceleration due to gravity.Vector3 object.F = ma.Big Picture Note: In each call to simulate(), cloth.applyForces() is called, which then calls applyGravity(). It also calls applyWind(), for which a simple implementation has been given. At this point, we are able to accumulate forces into each of our cloth's particles... But nothing is happening in the scene yet, because the particles don't know what to do with the forces acting on them!
Now, we will perform numerical integration to compute each particle's change in position. There are many ways of integrating our equations of motion, which include Euler's method (explicit and implicit), Verlet algorithm, Runge-Kutta method, and more. In this assignment, we will use Verlet integration, an explicit integrator that is fairly accurate and relatively easy to implement.
Verlet integration computes a point mass's new position at time \(t + dt\), \(x_{t+dt}\) as follows:
\[x_{t+dt} = x_t + (1 - D) * v_t * dt + a_t * dt^2\]
where \(x_t\) is the current position, \(v_t\) is the current velocity, \(a_t\) is the current total acceleration from all accumulated forces acting on the particle, \(D\) is a damping coefficient DAMPING, and \(dt\) is the global constant TIMESTEP.
In Verlet integration, we approximate \(v_t * dt = x_t - x_{t - dt}\), where \(x_{t - dt}\) is the particle's previous position from the last timestep.
\[x_{t+dt} = x_t + (1 - D) * (x_t - x_{t - dt}) + a_t * dt^2\]
Step 1: Implement the Particle.prototype.integrate function in js/particle.js so that it performs Verlet integration on the particle with the provided deltaT parameter. (i.e. deltaT is the \(dt\) in the equations above). See the comments for more details.
Step 2: Now, go back to js/cloth.js and fill in the code for the Cloth.prototype.update function, so that each of its particles performs Verlet integration to compute its new position for the current timestep.
At long last, we can now observe our cloth falling to the floor due to gravity! However, note that we have not yet implemented any collision detection, so our cloth will clip through the floor in some pinning configurations (such as OneEdge).
Try the following to sanity check your work so far:
 gravity force (default wireframe, corners pinned)
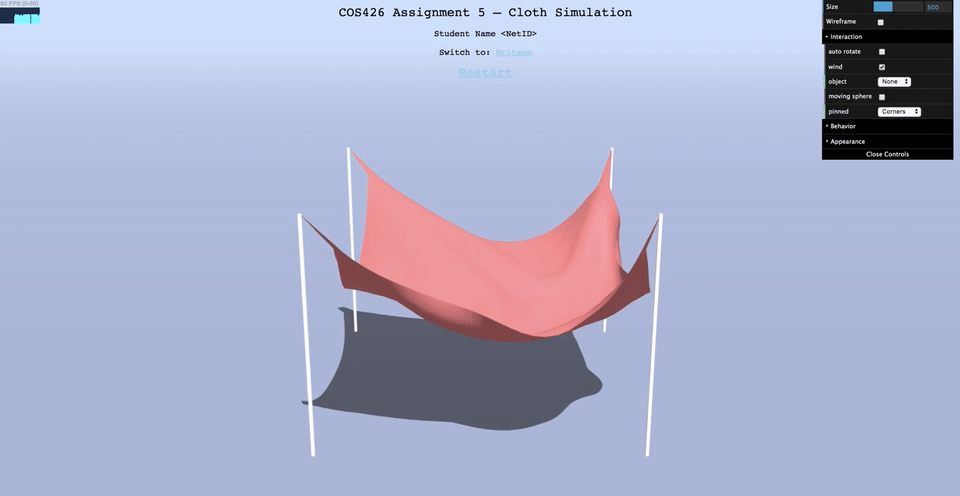
 gravity force (default cloth, corners pinned)
 provided simple wind force (default wireframe, corners pinned)
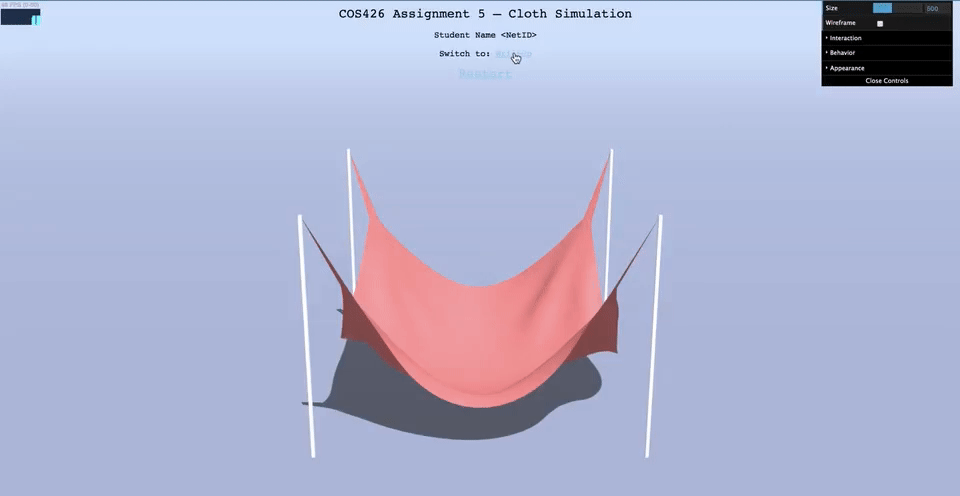
 provided simple wind force (default cloth, corners pinned)
In this part, we will add support for collisions with other objects for more interesting results.
First, let's handle collisions with the floor in our scene. The floor is a x-z plane with y-coordinate equal to GROUND_Y. For this part, assume that the floor is an infinite plane and that objects in our scene are guaranteed to start initially above this plane. As a result, it's possible that forces such as gravity could cause objects to collide with the plane from above.
Step 1: Fill in the Particle.prototype.handleFloorCollision function in js/particle.js.
If the particle's y-coordinate is less than GROUND_Y, simply force the position's y-coordinate back to GROUND_Y. At a macro scale with a relatively small timestep, this is a simple, yet effective method of simulating floor collisions.
Step 2: Now, go back to js/cloth.js and fill in the code for Cloth.prototype.handleCollisions function, so that it calls handleFloorCollision on each of its particles. You should be able to observe your cloth properly interacting with the floor in pinning configurations such as "OneEdge", or by simply increasing the size of your cloth.
Side Note: In Part 4, you may extend this to work for any general plane with particle collisions coming from either side of the plane, and also account for more realistic factors such as friction.
 floor collision (default wireframe, corners pinned)
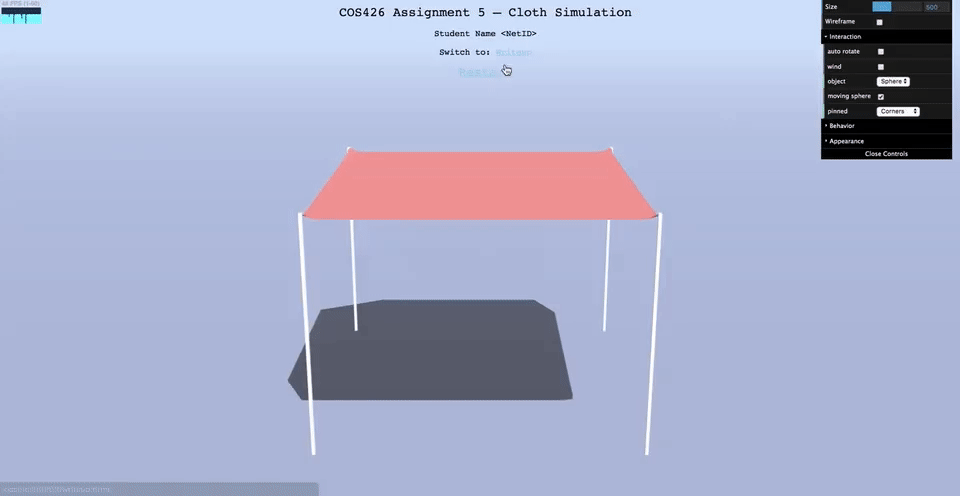
 floor collision (default cloth, corners pinned)
In our scene, there is a global variable called sphere maintained by the simulation program.
You can toggle its existance in the scene by changing the object's dropdown menu to Sphere.
In addition, you can have the ball move around in the scene in a repeated loop by checking moving sphere. However, the sphere is invisible, and you will not be able to notice its existance until you have written some code.
Step 1: Fill in the Particle.prototype.handleSphereCollision function in js/particle.js.
posNoFriction, which is the projection of the particle's current position to the nearest point on the sphere's surface.posFriction, which is the particle's previous position, adjusted by the sphere's movement in the last timestep. If the sphere is not moving, then this adjustment should be zero. This adjustment simulates perfect friction (i.e. friction = 1). However, to generalize it to any friction parameter, let the particle's new position be the weighted sum of posFriction and posNoFriction, weighted by friction and 1 - friction, respectively.posNoFriction. You do not have to account for friction in this case.Step 2: Now, go back to js/cloth.js and edit the code for Cloth.prototype.handleCollisions function, so that it also calls handleSphereCollision on each of its particles. In the simulation, change the object to be "Sphere", and you should be able to observe your cloth properly interacting with it.
posNoFriction and posFriction are initialized as zero Vector3 objects for your convenience.sphereSize.spherePosition.prevSpherePosition.friction is a global variable initialized to 0.9, and can be changed interactively in the GUI.js/render.js and modifying the sphere's material so that it has an opacity of 1.0. Then, you can view your scene with the sphere in wireframe mode. It's expected that the cloth will appear to clip with the sphere at the surface in normal viewing mode. sphere collision (default wireframe, corners pinned)
 sphere collision (default cloth, corners pinned)
 moving sphere collision - your results may vary depending on how the ball moves and when your cloth drops (default cloth, corners pinned)
In addition to the sphere, there is also a global variable called box maintained by the simulation program.
You can toggle its existance in the scene by changing the object's dropdown menu to Box.
Unlike the sphere, this box does not move and is static in the scene. However, the box is also invisible, and you will not be able to notice its existance until you have written some code.
Step 1: Fill in the Particle.prototype.handleBoxCollision function in js/particle.js.
posNoFriction, which is the projection of the particle's current position to the nearest point on the box surface. You may assume that the box is axis-aligned, similar to the one you worked with in Assignment 3's raytracer.posFriction and posNoFriction, weighted by friction and 1 - friction, respectively. The box does not move, so you do not have to worry about "following" the box movements.posNoFriction. You do not have to account for friction in this case.Step 2: Now, go back to js/cloth.js and edit the code for Cloth.prototype.handleCollisions function, so that it also calls handleBoxCollision on each of its particles. In the simulation, change the object to be "Box", and you should be able to observe your cloth properly interacting with it.
posNoFriction and posFriction are initialized as zero Vector3 objects for your convenience.boundingBox, which is a Three.js Box3 object. You can use Box3's API to determine whether or not a point is inside of it. In addition, the Box3 object also has its min and max points, which define its extent in 3D space.friction is a global variable initialized to 0.9, and can be changed interactively in the GUI.js/render.js and modifying the box's material so that it has an opacity of 1.0. Then, you can view your scene with the box in wireframe mode. It's expected that the cloth will appear to clip with the box at the surface in normal viewing mode. box collision (default wireframe, corners pinned)
 box collision (default cloth, corners pinned)
Implement one or more extension(s) of your choice to the cloth simulation! You need to complete at least 1 point in order to meet the full 10 points for this assignment. However, you are welcome to tackle more if you have time and are interested, but with diminishing returns on each point past the first 1 (see the Scoring section of the main assignment page for more details).
Here are a few ideas and possible points for each:
More technical extensions
time (which is Unix time in milliseconds) with some sinusoidal functions. To do so, edit the definitions of windStrength and windForce in the Cloth.prototype.applyWind function.Cloth.prototype.handleSelfIntersections. This can be enabled in the GUI by checking the corresponding box. A simple, naive implementation is sufficient to get 1.5 points, though you can earn additional points if you can optimize this further! One such efficient approach is called spatial hashing. Feel free to look around online to learn more about this (or ask on Piazza). Alternatively, find other efficient approaches for this feature. Regardless, if you use an outside source, be sure to cite them.Particle.prototype.handlePlaneCollision function and also introduce a new plane object in js/render.js. Read the current code to see how the sphere and box is done, and then add your own plane.js/cloth.js and js/particle.js, such as js/render.js and js/sim.js in order to support this.More artistic extensions
js/render.js and js/sim.js files and see how objects like the sphere and box are currently done. Then, play around with the codebase to create your own custom scene!js/render.js code and look for texture-related snippets of code that have been commented out. The provided starter code includes a textures/ directory with some sample images that can be texture mapped onto the different meshes in the scene (e.g. cloth, ground). Start by trying those out to check your understanding of how the Three.js code works in js/render.js for applying textures to objects. Then, create your own textures (or find some online) and edit the js/render.js code to create a more visually exciting scene for your cloth. Put any new textures that you use in the textures/ directory, and write about them in your writeup.(1.0 - 3.0) Your own idea! There is a lot of room in which this simple cloth simulation can grow, so feel free to be as creative as you like. If you have any questions or concerns about your idea, ask us on Piazza.