

 Sun Nov 7 08:46:30 EST 2004
This is truer than expected. As you do the lab, please be sure to use the suggested names for variables and functions (hit and hits are different!). Don't use the name "int" for a variable; it's a reserved word in (some versions of) Javascript.
If you can, use Mozilla instead of IE, which is not helpful about identifying errors. With Mozilla, under Tools / Web Development, select Javascript Console to bring up a window that provides good diagnostics about syntax errors and other problems in your program.
There is some weirdness that causes some programs in some browsers to not stop properly under some circumstances, even though the same code in my browsers works fine. Don't worry about this aspect; we won't either.
When you're done, please make sure that you understand and have followed the instructions for submitting your work, and that you have safely saved your work in a permanent place as well in case something goes wrong. Check with the lab assistants!
The game you wrote in the previous lab was quite static and purely textual: nothing happened until the user typed a number into a dialog box, and the only reward was the dubious intellectual satisfaction of using binary search. This lab will build a game that is much less cerebral (if that's the right word in this context), and a bit more graphical and interactive. It's a rudimentary version of "shoot 'em up" games like Doom or Quake, though the real inspiration is my favorite arcade game, Whack a Mole. In honor of that, let's call the game WhaM.
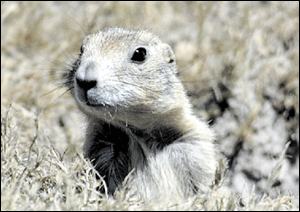
In WhaM, an image (in my case, of a prairie dog like the ones above) jumps randomly around the screen. Your job is to hit the image with the mouse as fast as you can; after ten hits, your elapsed time is reported, and you get a chance to play again.
No prairie dogs were harmed in the creation of this lab. Image from www.animalinfo.org/species/rodent/cynomexi.htm.
In this lab, you will write Javascript code that interacts much more closely with the browser than in the previous lab.
In Javascript's normal environment, the browser that is running the Javascript compiler and interpreter provides a library of useful functions that make it possible to control what the user sees on the page, and to provide interactive processing of user interface components like buttons, check boxes, option selectors, and text. It's also possible to generate HTML on the fly and and thus create and modify web page contents under program control. In this lab, we'll investigate only a small number of these features:
The browser lets a Javascript program manipulate a handful of objects, of which two matter here: the window that is currently being displayed, and the document that it contains. These objects, and their sub-components, have properties like position, color, text, images, etc., that can be examined and manipulated by Javascript code. In addition, the objects can respond to external events like mouse motion and clicking, and to internally-generated events like the passage of time. By manipulating these features, it's not too hard to make a plausible game, or to achieve a variety of other interesting effects.
Javascript code itself is included in the web page in a couple of ways. First, it may appear anywhere between <script> and </script> tags, as in previous labs. Normally you would put all variables and functions inside a script tag at the top of your page.
Second, code can be included as an "event handler" for any object on the web page. The simplest example of this is a button in a form, as seen in an earlier lab. This example uses the onClick event to do an operation when the button is pressed, but you can also use onMouseover and onMouseout to perform some action when the mouse enters a region, like an image, and when it leaves. (This is how "rollovers" are done on web pages.) There are other mouse events as well, but these are sufficient for this lab.
If you want to ask the user to provide a value for your program to use -- such as the speed at which the prairie dog moves around -- you can use a prompt dialog box, or you can use a text field in a form. Here's how the latter possibility might look:
	<form>
	Interval <input type="text" id="interval" value="1000" size="5">
	</form
This will look like this:
We gave the text field an id, that is, an identification that other components of the web page can use to refer to it.
The text field is referred to subsequently by a rather long name that queries the document about an element with a specified id. You can get the value for the text field into a Javascript variable, or store a new value into the text field, as illustrated in these three statements:
	var ival = document.getElementById("interval").value
		// get the value of interval text field into variable ival
	ival = 2 * ival
		// double the interval
	document.getElementById("interval").value = ival
		// store the new interval back into the text field
Keep the names straight here: ival is a Javascript variable;
interval is the id of an object on the web page.
Your image is placed on the page with an img tag. The img tag will handle a variety of image encodings. For this lab, you will use either a GIF file or a JPG file. The prairie dog is a JPG file.
You can use any image that you like -- pop stars and politicians and professors are popular -- but aim for one that is not too big; use PaintShop or a similar program to crop a smaller image out of a big one, or to resize something.
    <span id="dog1" style="position:absolute; left:200px; top:100px">
    <img src="dog1.jpg">
    </span>
The style tag is syntactically finicky, so when you make your
own version of this kind of HTML, be sure you use exactly the same cases
and spelling and punctuation that you see here.
Once the image has been wrapped in a suitable span tag and given an id, you can use Javascript code to manipulate it, particularly to move it to some other position. For example, to move it to position (300,200), you can set its left and top styles to new pixel values, using almost the same klunky syntax as in the example above:
	document.getElementById("dog1").style.left = "300px"
	document.getElementById("dog1").style.top = "200px"
If you replace the literal positions like "300px" with computed
positions, the image will move each time these lines are executed
with new values.
The statement setInterval('code', ms) sets up a timer that will execute the code every ms milliseconds. Normally the code is a function call, and the function itself does the operation to be repeated. In our case, that operation is to move the image to a new random place, which we will put into a function called moveit. So your code will include a statement like
setint_val = setInterval('moveit()', int)
If you add this statement at the right place, the image should move once
per second. (The quotes are important; if you forget them, the program
may not work.)
The library function clearInterval gives you a way to stop the repeating operation (otherwise it would go on forever). The value returned by a call to setInterval is used in a call to clearInterval, like this:
clearInterval(setint_val) // stop the calls to moveitYou will have to use clearInterval to make the image stop moving.
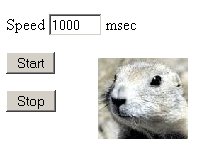
Your assignment is to implement a version of WhaM. Our minimalist version looks like this before it starts:
You can make yours look more professional if you wish, by laying out the components anywhere and using any sizes, fonts, and colors that you like. For example, you could use Imagemask buttons instead of Form buttons, as you learned how to do in the graphics lab. You could add an image background with <body background="something.jpg">, and you could make the dialog at the end more expansive as well.
This is the specification of what your program should do:
|
|
The items are listed in the specification in the order in which it seems easiest to write the program. You should do each piece and make it work before worrying too much about the next one.
Each component of the user interface has a name in the Javascript program; your interface doesn't have to look like the one above, but it will help you and us both if you use the names suggested below.
It can be a bit hard to keep the pieces in your mind, especially when you're new to programming. Here's a template for how things will look at the end; your job is mostly to figure out what replaces the comments in the template. Try to think clearly about what operation or operations each part must do, as implied by the spec above.
<script>
// declarations of variables

function moveit() {
	// your code to move image goes here
}

function hit() {
	// your code to handle each successful hit goes here
}

function newgame() {
	// your code to set up for each new game goes here
}
</script>

<span position attributes; use onClick here to call hit()>
 <img yourimage.jpg>
</span>

<form>
  Start button calls newgame()
  Stop button uses clearInterval to stop game
  Input text field for speed
</form>
For calibration, my version has fewer than 30 lines of code, so if yours
is a lot bigger, you may be off on the wrong track.
Lay out the components: Start button, Stop button, initial image, and a way to set a new interval (e.g., a form or another button).
You will need variables for several values used by your program, including hits for the number of times the image has been hit so far, interval for how long the image stays in one place, and start for the time at which the current game started. These are likely to be used in several places in your program, so you will want to declare them at the beginning of your program, before any of the function definitions:
	var hits
	// etc.
You have to move the image every time the user successfully hits it with the mouse, and also each time the setInterval mechanism operates. So it's best to write a function that does the move operation and call it from those two places. Write a function called moveit that will move the image to a new random place each time the function is called. The function will look like this:
function moveit() {
	document.getElementById("dog1").style.left = 500 * Math.random() + "px"
	// other statements go here
}
The built-in function Math.random produces a different
(pseudo-)random number between 0 and 1 each time it is called;
multiplying that by 500 scales it up to a number between 0 and 499. So
this line creates a new random x value, and sets the left coordinate of
the image to that many pixels. Thus this line will move the image to a
new random horizontal position each time the function moveit is
called.
You will have to create similar lines for the vertical position, and get them all into moveit properly. You should also use different values than 500 to make better use of the screen area.
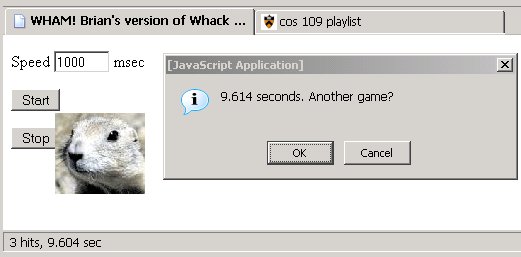
The function hit has to increment the number of hits and test whether it has reached 10; if not, there's nothing more to do and it can return. If the count is 10, however, hit should display a dialog box with the elapsed time and ask the user about another game. If the user wants to play again, then everything has to be re-initialized and the game reset to start over. Otherwise, the program is done.
This will require an if statement to compare the number of hits to 10, and another if to check the response. It's easiest to use the function confirm():
answer = confirm("Another game?")
confirm is like prompt: it will pop up a dialog box, then return
true if the OK button is pushed, and false if the Cancel button is
pushed. This lets you write the if statements that will decide
whether to play another game or quit, depending on the user's response;
for example, it might be some variation on
	if (confirm("Another game?")) {
		// code to play another game
	} else {
		// code to quit
	}
start = (new Date()).getTime() // the time right now, in millisecondsand something analogous later to get the stop time. The difference between those two values is the elapsed time, still in milliseconds. You have to convert that to seconds and display it.
Even though this is your second Javascript program you are still liable to make mistakes. Write small sections at a time, and test as you go, as we have been suggesting above.
Use alert statements to display results as computation proceeds, or just to verify that your program is going where you think it is. These are easy to add and help narrow down problems quickly.
Add comments to your code to remind yourself of what some statement is doing, and perhaps to help the grader figure out what you had in mind as well. You can also "comment out" alert statements by sticking // at the beginning of the line; this leaves the code there for future use but it doesn't affect the program until you uncomment it.
Indent your code the way it has been shown in class, and the way it appears in the instructions. Indenting the statements helps you see quickly what's included in a function or a condition or a loop; you should always maintain consistent indentation.
It is a good idea to make sure that one of the lab assistants has seen your project in its working state, and that your files have been properly saved in your Unix account. If you're working on a cluster machine, mailing the file to yourself is a good way to preserve a copy. Do all of these before you quit.